Tuesday, 28 February 2017

DIY Terrarium

Hi Crafty Friends,
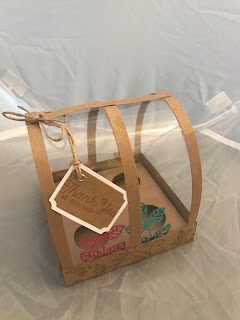
I had a request on how to make a terrarium using our card stock.  This is something that I made some time ago as I had seen one made by one of the Stampin' Up! design team.  This is my take on their beautiful project.


Step 1- Start with a cardstock base (I used Kraft) measuring 6 5/8" x 6 5/8"(17 x 17cm score at 2.5cm) and I scored on all sides at 1"
Stamp all over the base of this piece using the flourish stamp from Flourishing Phrases in Early Espresso or Chocolate Chip ink).
Fold along the score lines and miter the corners as shown. Adhere corners to form box shape as shown.

Step 2- Cut 3 strips of Kraft measuring 11 3/4" x 1/4" (30 x 1cm)
Cut another strip measuring 4 1/2" x 1/4" (11.5cm x 1cm)
Attach the three strips to the shorter strip as shown

Step 3 - Cut Acetate sheet to 11 3/4" x 4 1/4" (30cm x 11cm)
Apply tear tape to each of the short ends of the acetate

Step 4 - Cut a square of Kraft measuring 5 1/2" x 5 1/2" (14 cm x 14cm)
Score each side at 1/2" (1.2cm)
Step 5 - Using the 1 1/4" circle punch, punch 4 holes in the cardstock spacing evenly in the large square
Miter the corners and adhere to form box shape.

Step 6 - Decorate insert with die cuts from the Flourish Thinlits that match the stamp set.

Step 7 - Attach thin strips of Kraft to sheet of acetate
Attach the acetate sheet to the box base and adhere with the tear tape on the bottom of the acetate.

Step 8 - Add in the insert with the holes for the pots


Step 9 - Attach tag using the linen thread and a sentiment from the Flourishing Phrases stamp set cut with the Tags and Labels Framelits.


Monday, 27 February 2017

Custom Embossing Folder

Hi Crafty Friends,

Well, I've just been playing again and this idea has been around for a while but I decided to try it for myself.  I made my own custom TIEF (embossing folder) using the Build It set of dies from the Stampin' Up! Occasions catalogue.

Now I can create gorgeous backgrounds that totally co-ordinates with the dies and the Nailed It stamp set.  How awesome is that!


Step 1-
Using a panel of chipboard (the backing of a DSP pack works well) approximately 5 x 7" (you will need 2 of these)
Die cut your shapes in any pattern you choose. You can have more or less of a particular shape to what I have done, this is just how I've done mine.


Step 2-
Once your panel is cut, lay your cut panel directly over your uncut panel and fasten the top only using a strong tape. I have used fabric / fibre duct tap


Step 3- 
Keeping your folder in the closed position, start to glue down your die cut shapes in the holes provided (I have mine open just to show you how it will look)
By adhering them with the folder closed, this ensures that they will line up properly.


Step 4-
After letting the glue dry completely, your folder is ready for use.
You simply place a sheet of card stock into your open folder, close it and run it through you Big Shot.
You may need to use another sheet of chipboard as a shim or simply place 2 layers of chipboard on your base piece of the folder.

I hope you find this useful. I'm already planning my next embossing folder. Stay tuned, I will share a card with you later today where I am using this folder.

Until next time,
Stay Crafty,
XO Tan

Monday, 20 February 2017

Eggcellent Easter Cards...

Hi Crafty Friends,
Just sharing a quick video of how I made my easter bendy Diorama card.
Let me know what you think.

I'm working on a few more ideas for Easter now and will get back to you all shortly.
Stay Crafty,
XO Tan

Saturday, 18 February 2017

Feelin' Tha Love

Hi Crafty Friends,

This week I've been busy working on a range of wedding stationary and accessories for the upcoming Made With Love markets held in March.  This is something new to me and I had to draw on the love of Valentines day to get it done.  What do you love the most? For me, its my family, friends and paper....lots and lots of paper.


I am hoping that I have inspired the inner romantic in you.
Now I'm off to share the love with my beautiful daughter.....
Until next time,
Stay Crafty,
XO Tan

Monday, 13 February 2017

Mixed Media Superclass!

Hi Crafty Friends,

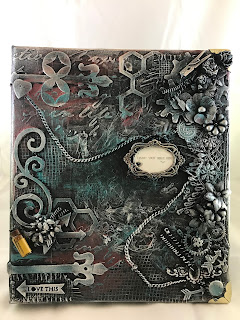
On the weekend we had the first of our mixed media classes. While the entire state of NSW was sweltering in the record breaking heatwave, we chilled inside playing with paint, glue, and lots and lots of embellishments. Everyone decorated a photo journal and learnt the basics of creating a mixed media piece and de-mystifying all the different mediums available.


I was the only one that went the 'dark side' and had a black gesso base. Everyone else went for a white gesso.  It provides a dramatic background for your piece.  


It is amazing how much interest you can create just by using everyday items such as hessian, and paper flowers.
We all had a great day and went on to continue the fun later that night with more  pieces to create after the sun went down.

My daughter was so happy with her album, she's going to take it to school and explain the technique to her class for her news item


If this is something that you would like to give a go, drop me a line and we can add you to our next class. 

Until next time,
Stay Crafty,
XO Tan

Thursday, 9 February 2017

Making Magic!

Hi there crafty friends,
I've been playing again.  It all started when my baby Boy turned 21 on Saturday. Now, I always try to make something different and unique for each of my kids birthdays and I knew I had to come up with something extra special.  After a couple of failed attempts, I came up with my finished card.  I had seen something similar a few years ago so I knew it could be done.  I just had to find a way of getting what I wanted.


So, What do you think?? I was very happy with the finished card as was my son. When you turn the ribbon it reveals the second photo. Then my beautiful daughter made her  brother a card too. She absolutely loves everything Stampin' Up! Who can blame her when there are so many awesome products to chose from.

After all the excitement of the birthday, and of course lots and lots of cake, I wanted to keep the magic alive and kept making magic......

Here's the next card I made with the same technique.


........and then......


This Saturday we are having our Mixed Media Superclass. I have one space left so please let me know if you would like to join us for an amazing day and you live in the Coffs region.
Until next time everybody,
Stay Crafty XO Tan