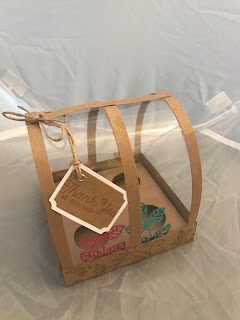
I had a request on how to make a terrarium using our card stock. This is something that I made some time ago as I had seen one made by one of the Stampin' Up! design team. This is my take on their beautiful project.
 Step 1- Start with a cardstock base (I used Kraft) measuring 6 5/8" x 6 5/8"(17 x 17cm score at 2.5cm) and I scored on all sides at 1"
Stamp all over the base of this piece using the flourish stamp from Flourishing Phrases in Early Espresso or Chocolate Chip ink).
Fold along the score lines and miter the corners as shown. Adhere corners to form box shape as shown.
Step 2- Cut 3 strips of Kraft measuring 11 3/4" x 1/4" (30 x 1cm)
Cut another strip measuring 4 1/2" x 1/4" (11.5cm x 1cm)
Attach the three strips to the shorter strip as shown
 Step 3 - Cut Acetate sheet to 11 3/4" x 4 1/4" (30cm x 11cm)
Apply tear tape to each of the short ends of the acetate

Step 4 - Cut a square of Kraft measuring 5 1/2" x 5 1/2" (14 cm x 14cm)
 Score each side at 1/2" (1.2cm)
Step 5 - Using the 1 1/4" circle punch, punch 4 holes in the cardstock spacing evenly in the large square
Miter the corners and adhere to form box shape.
 Step 6 - Decorate insert with die cuts from the Flourish Thinlits that match the stamp set.
Step 7 - Attach thin strips of Kraft to sheet of acetate
Attach the acetate sheet to the box base and adhere with the tear tape on the bottom of the acetate.
Step 8 - Add in the insert with the holes for the pots

 Step 9 - Attach tag using the linen thread and a sentiment from the Flourishing Phrases stamp set cut with the Tags and Labels Framelits.

No comments:
Post a Comment